Unique Camper Paint Jobs: Guide to Transform Your RV
Table of contents
Are you tired of your camper blending in with every other RV at the campground? A custom paint job might be exactly what you need. Unique camper paint jobs can transform an ordinary recreational vehicle into a personalized travel companion that turns heads wherever you go. Cool RV paint jobs aren’t just about aesthetics—they protect your investment, extend your camper’s lifespan, and express your personality. While professional exterior cool camper paint jobs can cost upwards of $10,000, the DIY approach has become increasingly popular among budget-conscious travelers. This comprehensive guide covers everything you need to know about camper paint jobs, from finding inspiration to execution and maintenance, suitable for both beginners and experienced DIYers.
Why Consider a Custom Paint Job for Your Camper
Investing in a unique paint job for your camper offers numerous benefits beyond just improving its appearance. Let’s explore the compelling reasons to consider this transformation.
Protection Against the Elements
Your RV faces harsh conditions on the road—from scorching sun to driving rain, road salt, and debris. A quality paint job creates a protective barrier against these elements, preventing premature aging of the exterior materials. This protection is particularly important for fiberglass RVs, which can become chalky and porous when the gel coat deteriorates. Plus, exterior cool camper paint jobs not only shield your rig but also give it a stylish, standout look on the road.
Increased Resale Value
A well-executed paint job can significantly boost your camper’s resale value. Potential buyers are often willing to pay more for an RV that looks well-maintained and modern. In fact, a fresh, unique exterior can make an older model appear years newer, potentially adding thousands to its market value.
Personal Expression
Your camper is your home on wheels—shouldn’t it reflect your personality? Exterior cool camper paint jobs allow you to express yourself through design, color, and theme. Whether you prefer subtle elegance or bold statements, your RV can become a canvas for your creative vision.
Cost-Effective Modernization
Purchasing a new RV can cost tens of thousands of dollars. A unique paint job offers a budget-friendly alternative to buying new, allowing you to transform an outdated camper into a modern, stylish travel vehicle. When combined with other upgrades like new awnings or custom skirting, a paint job can completely revitalize your camping experience.
Popular Unique Camper Paint Styles and Themes
When planning your camper’s transformation, drawing inspiration from popular styles can help you refine your vision. Here are some of the most beloved approaches to cool RV paint jobs.
Vintage-Inspired Designs
Retro-styled campers have experienced a massive resurgence in popularity, with many RV owners embracing nostalgic aesthetics from various decades.
1950s Pastels and Chrome
The 1950s were characterized by soft pastel colors paired with gleaming chrome accents. Think mint green, baby blue, or coral pink with polished metal trim. This combination creates a cheerful, classic look that pairs beautifully with vintage-style white wall tires and chrome hubcaps. For authenticity, consider adding period-appropriate details like pinstriping or two-tone color schemes with a white roof. If you’re aiming for a standout look, exterior cool camper/RV paint jobs inspired by these retro hues can make your camper truly eye-catching and nostalgic.
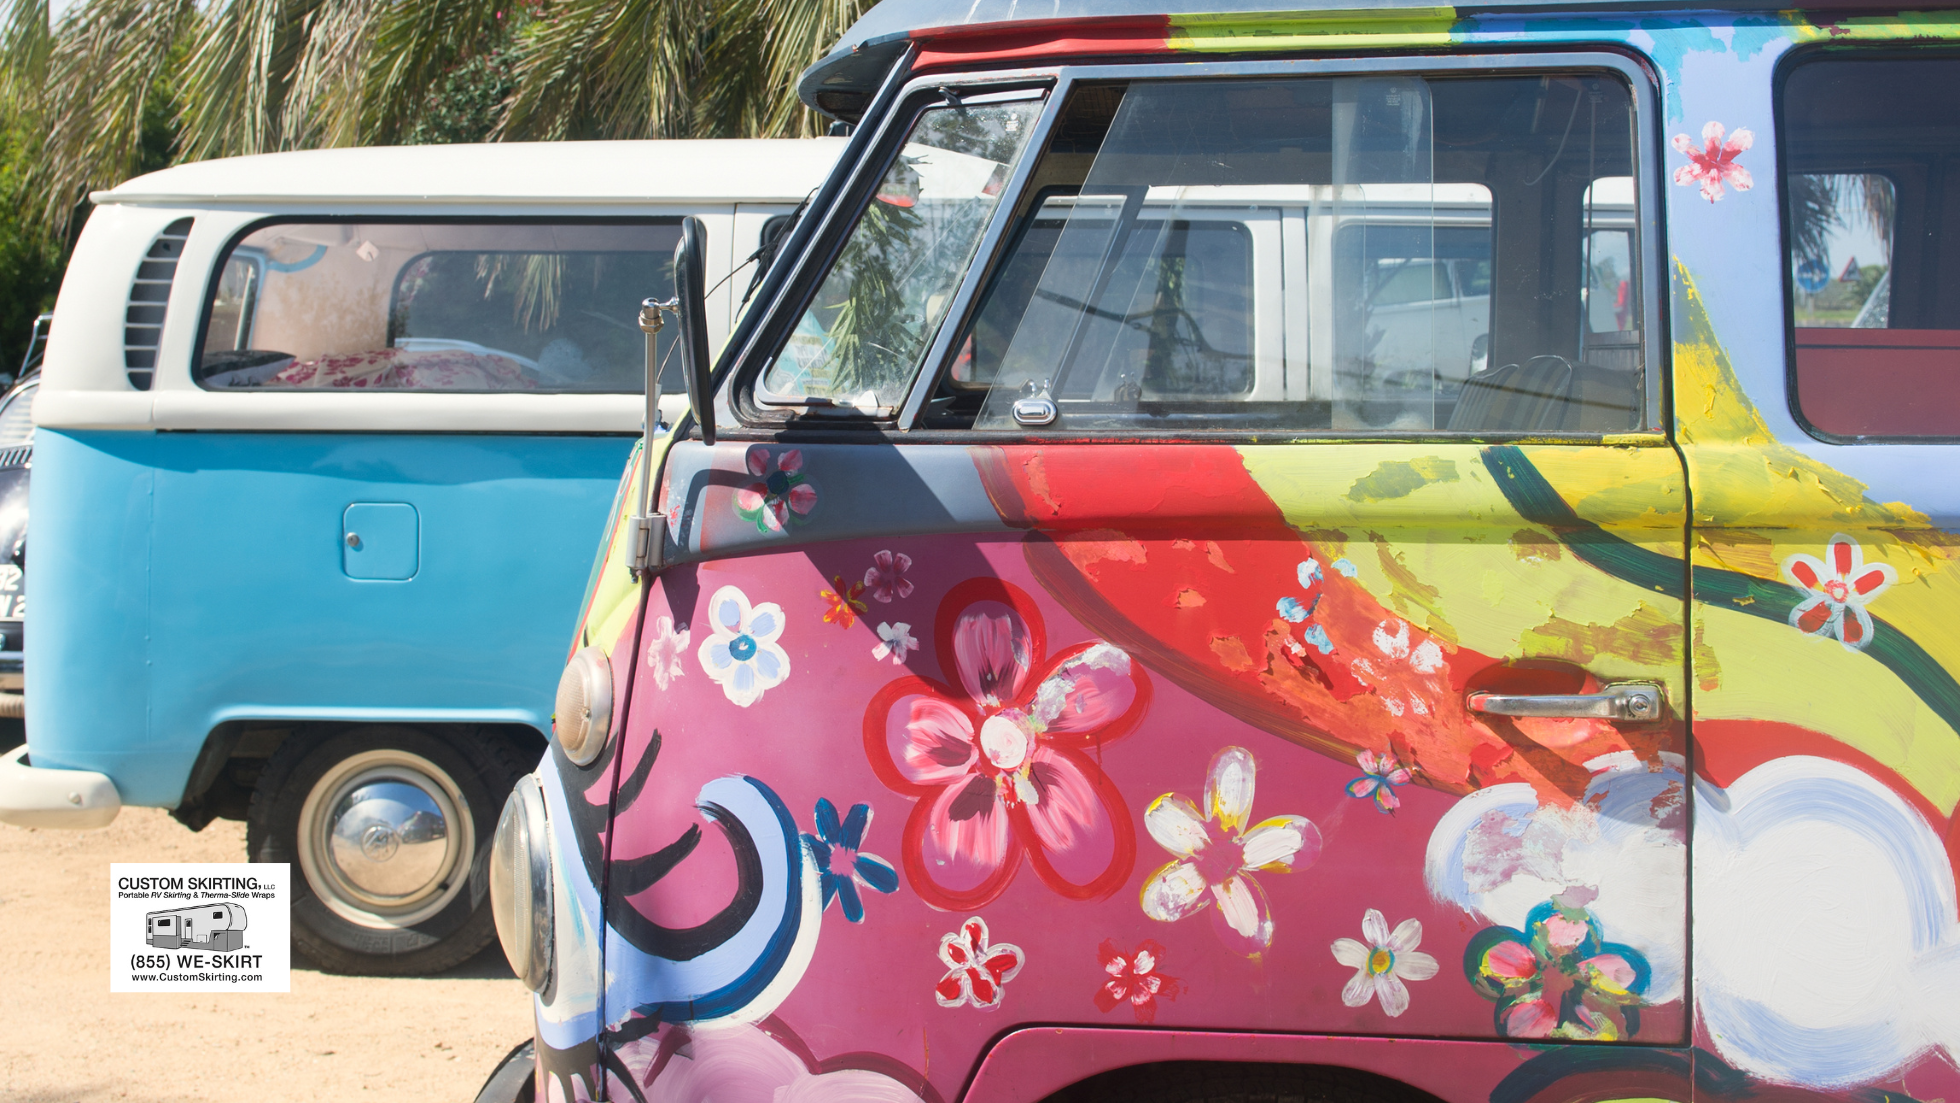
1960s Psychedelic Patterns
Bold, flowing patterns in vibrant colors define the psychedelic style of the 1960s. These eye-catching designs often feature swirling shapes, flowers, and peace symbols. While covering an entire camper in psychedelic patterns might be overwhelming, you can incorporate these elements as accent designs against a solid background color.
1970s Earth Tones and Stripes
The 1970s brought earthy color palettes—think harvest gold, avocado green, and burnt orange—often combined with bold racing stripes or geometric bands. This style works particularly well on boxy campers and can be modernized with metallic or high-gloss finishes for a contemporary twist on a classic look. For those seeking exterior cool camper/RV paint jobs, these retro-inspired colors and designs offer a unique way to stand out on the road.
Nature and Landscape Themes
For outdoor enthusiasts, incorporating natural elements into your camper’s exterior creates a harmonious connection with the environments you’ll be exploring.
Mountain Silhouettes
Mountain range silhouettes wrapping around the lower portion of a camper create a striking effect, especially when painted in contrasting colors against the base. This design can be as simple or detailed as your skill level allows, from basic jagged outlines to more complex scenes with layered ridges and peaks. Exterior cool camper/RV paint jobs like this not only enhance the visual appeal but also give your camper a unique and personalized touch.
Forest Scenes
Woodland themes featuring trees, wildlife, and forest elements can transform your camper into a rolling tribute to nature. Consider how the design will work with your camper’s shape—tall pines might align perfectly with the vertical lines of your RV, while a forest scene could wrap naturally around the contours.
Ocean and Beach Panoramas
Coastal-inspired designs featuring waves, beaches, and marine life create a vacation vibe wherever you travel. These designs often work best with a gradient blue background representing the sky, transitioning to turquoise or deep blue for water elements. Adding dimensional effects like whitecaps on waves can create impressive visual depth.
Bold Geometric Patterns
Modern, geometric designs can make even vintage campers look contemporary and stylish.
Color Blocking
This technique involves dividing your camper into distinct sections of solid colors. The key to successful color blocking lies in choosing complementary colors and creating clean, precise divisions between sections. This approach works particularly well on campers with natural panel divisions or structural elements that can serve as boundaries between colors.
Chevron and Diagonal Designs
Chevron patterns (inverted V-shapes) and diagonal stripes create dynamic movement across your camper’s surface. These designs can make a small camper appear longer and more streamlined. For best results, use painter’s tape to create perfectly straight lines and consistent angles.
Abstract Shapes
Free-form geometric shapes in contrasting colors create a modern, artistic appearance. This style allows for considerable creativity while maintaining a contemporary aesthetic. Consider how the shapes will flow around windows, doors, and other features of your camper to achieve unique camper paint jobs.
Whimsical and Character-Based Designs
Playful, personality-filled designs make camping more fun and can be especially appealing for families with children.
Cartoon Characters
From beloved classics to original creations, cartoon characters add personality and charm to your camper. These designs can range from simple silhouettes to detailed, colorful renderings. Remember to consider copyright issues if recreating commercial characters.
Animal Themes
Wildlife-inspired designs—whether realistic or stylized—connect your camper to the natural world. Popular choices include bears, wolves, eagles, and deer for mountain campers, or dolphins, turtles, and tropical fish for beach-bound RVs.
Storybook Scenes
Narrative-based designs tell a story across your camper’s exterior. These might depict camping adventures, road trip scenes, or fantasy landscapes. The wraparound nature of a camper provides the perfect canvas for a continuing narrative that unfolds as viewers walk around your RV.
Planning Your Unique Camper Paint Job
Proper planning is crucial for a successful paint job. This preparation phase will save you time, money, and frustration during the actual painting process.
Assessing Your Camper’s Current Condition
Before picking up a paintbrush, thoroughly evaluate your camper’s exterior to identify issues that need addressing.
Surface Inspection
Carefully examine every inch of your camper’s exterior for damage. Look for:
- Rust spots on metal components
- Cracks or delamination in fiberglass
- Dents or creases in aluminum siding
- Soft spots indicating water damage
- Peeling or bubbling of existing paint
Document these issues with photos and measurements to create a comprehensive repair plan.
Material Identification
Different camper materials require specific preparation and paint products:
- Aluminum siding needs proper etching and metal-specific primers
- Fiberglass requires filling of pinholes and careful sanding
- Wood components need sealing against moisture
- Plastic elements may need special adhesion promoters
Consult your camper’s manual or contact the manufacturer if you’re unsure about exterior materials.
Decal Decisions
Many campers feature factory decals or graphics. You’ll need to decide whether to:
- Remove them completely (which may require heat guns, adhesive removers, and significant effort)
- Paint over them (which might show texture through the new paint)
- Incorporate them into your new design
The condition and thickness of existing decals will influence this decision.
Designing Your Concept
Creating a clear vision before painting will help ensure satisfying results.
Sketching Ideas
Begin by sketching your design ideas on paper. Draw your camper from different angles (front, sides, rear) to visualize how the design will wrap around corners and interact with features like windows and doors. Consider how the design will look when slide-outs are extended or awnings are deployed.
Digital Mockups
For more precise planning, create digital mockups using:
- Photo editing software like Photoshop or GIMP
- RV-specific design apps
- Simple online graphic design tools like Canva
Take photos of your camper from multiple angles and overlay your design concepts digitally to visualize the end result.
Tape Visualization
For geometric designs or stripes, use painter’s tape directly on your clean camper to map out patterns. This hands-on approach helps you adjust proportions and positioning before committing to paint. Step back frequently to assess the visual impact from different distances.
Finding Inspiration
Gather ideas from various sources:
- Social media platforms like Pinterest and Instagram (#camperrenovation, #rvmakeover)
- RV and camping shows
- Camping magazines and websites
- RV renovation guides
- Classic vehicle paint schemes
- Art movements that resonate with your aesthetic preferences
Save images in a dedicated folder or board to refine your vision.
Budgeting for Your Paint Project
Understanding potential costs helps you plan realistically and avoid mid-project financial surprises.
Paint and Primer Costs
The largest expense will typically be paint and primers:
- Automotive paints: $100-300 per gallon
- Marine epoxy paints: $80-200 per gallon
- Exterior acrylic paints: $40-100 per gallon
- Specialty finishes (metallic, pearlescent): Add 30-50% to base paint costs
- Primers: $30-80 per gallon
- Clear coats: $50-150 per gallon
A typical camper might require 2-4 gallons of paint, depending on size and design complexity.
Tools and Equipment
Budget for these essential items:
- Sanding materials (sandpaper, blocks, electric sanders): $50-200
- Masking supplies (tape, paper, plastic): $30-100
- Application tools (brushes, rollers, sprayers): $50-500
- Safety equipment (respirators, goggles, gloves): $50-100
- Cleaning supplies: $20-50
- Repair materials (fillers, patches): $30-100
If purchasing a paint sprayer, budget $100-500 for a consumer-grade model or consider renting professional equipment.
Optional Enhancements
Consider these additional elements:
- Vinyl accents or decals: $50-300
- Specialty finishes: $100-300
- Protective clear coats: $100-200
- Professional design consultation: $100-500
Total Budget Range
For a DIY camper paint job, expect to spend:
- Basic single-color refresh: $300-800
- Multi-color design with simple patterns: $800-1,500
- Complex artistic design with special finishes: $1,500-3,000
These estimates assume you’re providing the labor yourself. Professional painting services typically start at $5,000 and can exceed $15,000 for custom artistic designs.
Selecting the Right Paint and Materials
The quality of your materials significantly impacts both the appearance and durability of your camper paint job.
Paint Types for Different Camper Surfaces
Choosing the appropriate paint for your camper’s specific materials is crucial for adhesion and longevity, especially when planning exterior cool camper/RV paint jobs.
Automotive Paints
Automotive paints offer excellent durability and UV resistance, making them ideal for campers that see frequent use.
- Urethane paints provide superior hardness and chemical resistance
- Acrylic enamels offer good durability at a lower price point
- Base coat/clear coat systems allow for metallic and pearl finishes
- Application typically requires spray equipment for best results
- VOC content is high, requiring proper ventilation and respiratory protection
These paints work well on metal, fiberglass, and properly prepared composite surfaces.
Marine Epoxy Paints
Designed for boats, marine epoxy paints offer exceptional water and weather resistance.
- Excellent adhesion to fiberglass and aluminum
- Superior resistance to moisture and humidity
- Available in limited color ranges compared to automotive paints
- Can be applied by brush, roller, or spray
- Typically more expensive than standard exterior paints
These are particularly good for campers used in coastal environments or high-humidity areas.
Exterior Acrylic Latex Paints
High-quality exterior house paints can be suitable for campers that see moderate use.
- More affordable than automotive or marine paints
- Easier application with standard brushes and rollers
- Lower VOC content makes them safer to work with
- Less durable than specialized automotive finishes
- May require more frequent touch-ups and maintenance
These work best on wood components or as base coats for more complex designs.
Specialized RV Paints
Some manufacturers produce paints specifically formulated for recreational vehicles.
- Designed to accommodate the expansion and contraction of RV materials
- Often include UV inhibitors and mildew resistance
- Available in colors matching factory RV finishes
- Can be more expensive than general-purpose paints
- May require ordering from specialty suppliers
These provide a good balance of performance and ease of application for DIY painters.
Essential Tools and Supplies
Having the right tools on hand makes the painting process smoother and produces better results.
Surface Preparation Tools
- Electric sanders (orbital and detail) for large areas
- Sanding blocks and hand sandpaper (80-600 grit range)
- Putty knives and spreaders for applying fillers
- Wire brushes for rust removal
- Pressure washer or hose with spray nozzle for cleaning
Masking and Protection Materials
- High-quality painter’s tape in various widths
- Masking paper and plastic sheeting
- Drop cloths for ground protection
- Liquid mask for intricate areas
- Painter’s plastic with pre-attached tape for windows
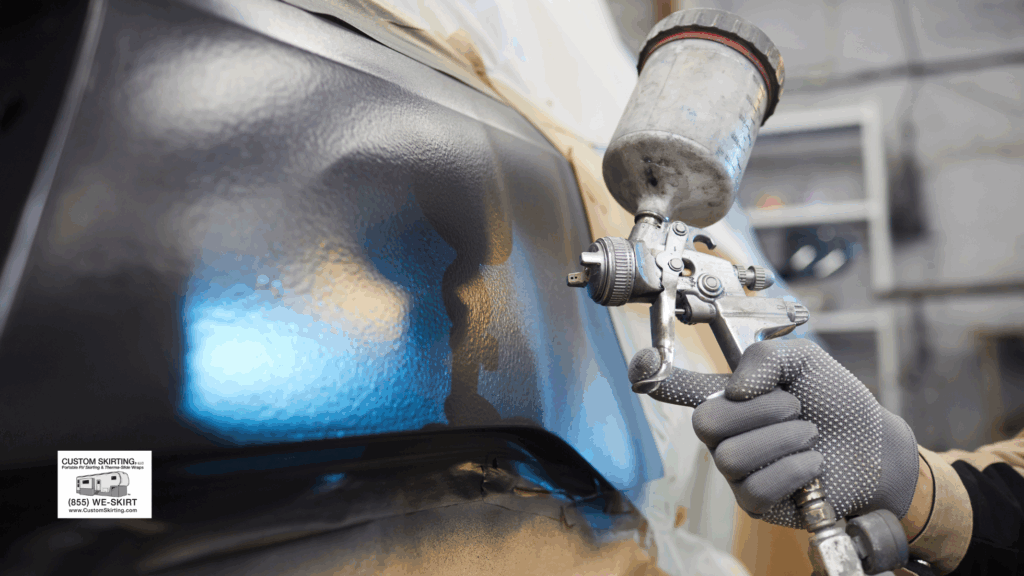
Application Equipment
For brush/roller application:
- High-quality synthetic brushes in various sizes
- Foam rollers for smooth surfaces
- Short-nap rollers for textured surfaces
- Paint trays and liners
- Extension poles for reaching high areas
For spray application:
- HVLP (High Volume, Low Pressure) spray gun for detailed work
- Airless sprayer for large areas and base coats
- Compressor with appropriate capacity
- Moisture and oil filters for compressed air
- Various spray tips for different paint viscosities
Safety Equipment
- Respirator with appropriate cartridges for your paint type
- Safety goggles or face shield
- Chemical-resistant gloves
- Coveralls or dedicated painting clothes
- Hearing protection when using power equipment
Color Selection Strategies
Choosing colors that complement your camper’s design while remaining practical for travel conditions requires careful consideration, especially when exploring exterior cool camper/RV paint jobs.
Environmental Considerations
Think about where you’ll primarily use your camper:
- Desert environments: Lighter colors reflect heat but show dust more readily
- Forested areas: Earth tones blend naturally and hide dirt and pollen
- Coastal regions: Blues and neutrals complement beach settings and show less salt spray
- Urban camping: Consider how colors will look in both natural and artificial lighting
Practical Color Choices
Some colors are more functional for travel vehicles:
- Medium tones show less dirt than very light or very dark colors
- Metallic finishes can help disguise minor scratches and dents
- Colors with gray undertones tend to look cleaner longer than pure bright colors
- Strategic use of darker colors near wheel wells and lower panels hides road grime
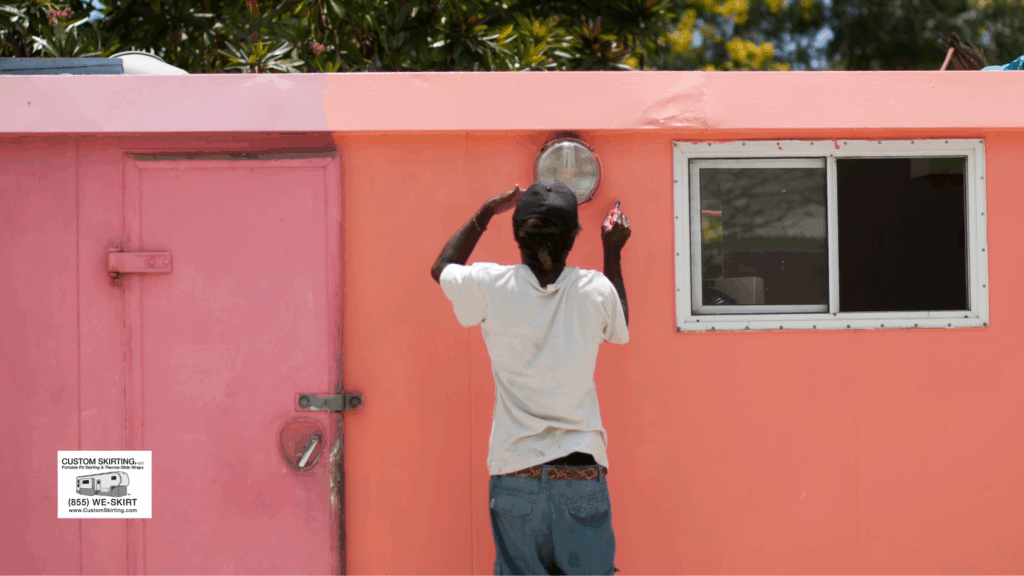
Preparation Process for a Professional-Looking Finish
The quality of your preparation directly determines the quality of your finished paint job. This crucial phase cannot be rushed.
Cleaning and Surface Preparation
Thorough cleaning ensures proper paint adhesion and a smooth, long-lasting finish.
Deep Cleaning
Start with a comprehensive cleaning process:
- Wash the entire exterior with automotive or RV-specific detergent
- Use degreaser on areas with oil or road film buildup
- Apply specialized cleaners for removing oxidation from fiberglass or aluminum
- Treat any mildew or algae growth with appropriate solutions
- Rinse thoroughly and allow to dry completely
For stubborn contaminants, clay bar treatment (as used in auto detailing) can remove embedded particles.
Creating an Ideal Painting Environment
The environment significantly impacts paint application and curing:
- Choose a location with minimal dust and debris
- Aim for temperatures between 65-85°F (18-29°C)
- Avoid high humidity (over 70%)
- Shield from direct sunlight during application
- Ensure adequate ventilation while controlling airflow to minimize dust
If possible, use a garage, barn, or temporary shelter with filtered ventilation.
Masking and Protection
Properly protect areas not to be painted:
- Remove hardware when possible (lights, vents, handles)
- Use painter’s tape with plastic sheeting for windows and doors
- Cover roof vents, air conditioners, and other fixed components
- Mask trim pieces that will remain their original color
- Protect nearby vehicles or structures from overspray
Take time to ensure tape is firmly sealed along all edges to prevent paint seepage.
Priming and Base Coat Application
Proper priming creates the foundation for a beautiful, durable finish.
Selecting the Right Primer
Different surfaces require specific primers:
- Bare metal: Self-etching primer or metal-specific primer
- Fiberglass: Adhesion-promoting primer or epoxy primer
- Wood: Exterior wood primer with mildew resistance
- Previously painted surfaces: General-purpose automotive primer
Primer Application Techniques
For optimal results:
- Apply primer in thin, even coats rather than one thick coat
- Allow proper drying time between coats (follow manufacturer recommendations)
- Apply 2-3 coats for complete coverage and maximum adhesion
- Sand lightly between coats with fine-grit sandpaper (320-400 grit)
- Remove all sanding dust before applying subsequent coats
Experience the Perfect Complement to Your Custom Paint Job!
Your newly painted RV deserves the ultimate finishing touch! While your unique paint job showcases your personality, Custom Skirting adds both protection and polish to your investment. Our team will blueprint and custom-tailor your RV skirting on-site, ensuring a flawless fit that perfectly complements your camper’s new look.
Our exclusive “No-Snap, No-Gap” channel system provides unmatched protection against the elements, sealing out water, snow, and wind more effectively than any other product available. With over a decade of testing in the harshest northern climates, Custom Skirting has proven itself as the nation’s #1 RV skirting solution.
Best of all, our user-friendly design allows for quick setup and takedown, so you can protect your beautiful paint job wherever your adventures take you. Get Custom Skirting today and give your freshly painted RV the protection and polished look it deserves!